♥ ♥ ♥

Archive for the ‘sweets’ Category

sesame-miso cookies and a year of this thing

In baking, cookies, sweets, year-round on 7 February, 2012 at 10:40 pm

A year ago today, probably to the hour, I was writing the first-ever post on this blog, about a fig I’d carried home so carefully in the palm of my hand. How long ago that all now seems.  

Last summer I was all anticipation, all breathless excitement for what was ahead. This summer? Defeat. I really don’t want to complain about the weather on this blog but I will say this: if I wanted to spend my summer wearing woolly cardigans and thick socks I’d have chosen to live in Iceland.* This summer I haven’t been nearly as excited about the glut of berries, the juiciest peach, the ripest tomatoes. This summer I’ve mostly wanted to throw on a blanket and curl up with a bowl of soup and maybe, you know, have a wee cry at the thought of actually being on a beach.

Okay, I may be being a bit dramatic. I mean, we have had little snippets of sunshine and I haven’t been wearing thick socks ALL summer (though I am wearing a big woolly cardigan as I type this). But it hasn’t felt like summer. So I guess I was hit with the realisation that, whoa, this time last year I was all excited about late summer and this year I’m still hanging on to this hope that we’re going to have this nice long languorous summer with jugs of Pimm’s in the late-afternoon sun and jandals. Figs? No, no, I’m not ready yet.

Every time I look out the window and see people walking by wearing boots and puffy jackets (for real!! it’s supposed to be February, for goodness’ sake!) I get a little bit sad, a little bit droopy-hearted. But maybe I’ve been looking at this all the wrong way. It’s not like we can do anything about what the weather’s going to do tomorrow. And maybe the best way is not necessarily declaring defeat or resignation, but instead accepting things for what they are. Moving forward. Getting on with it. If that means I have to wear tights in the summer months** then so be it.

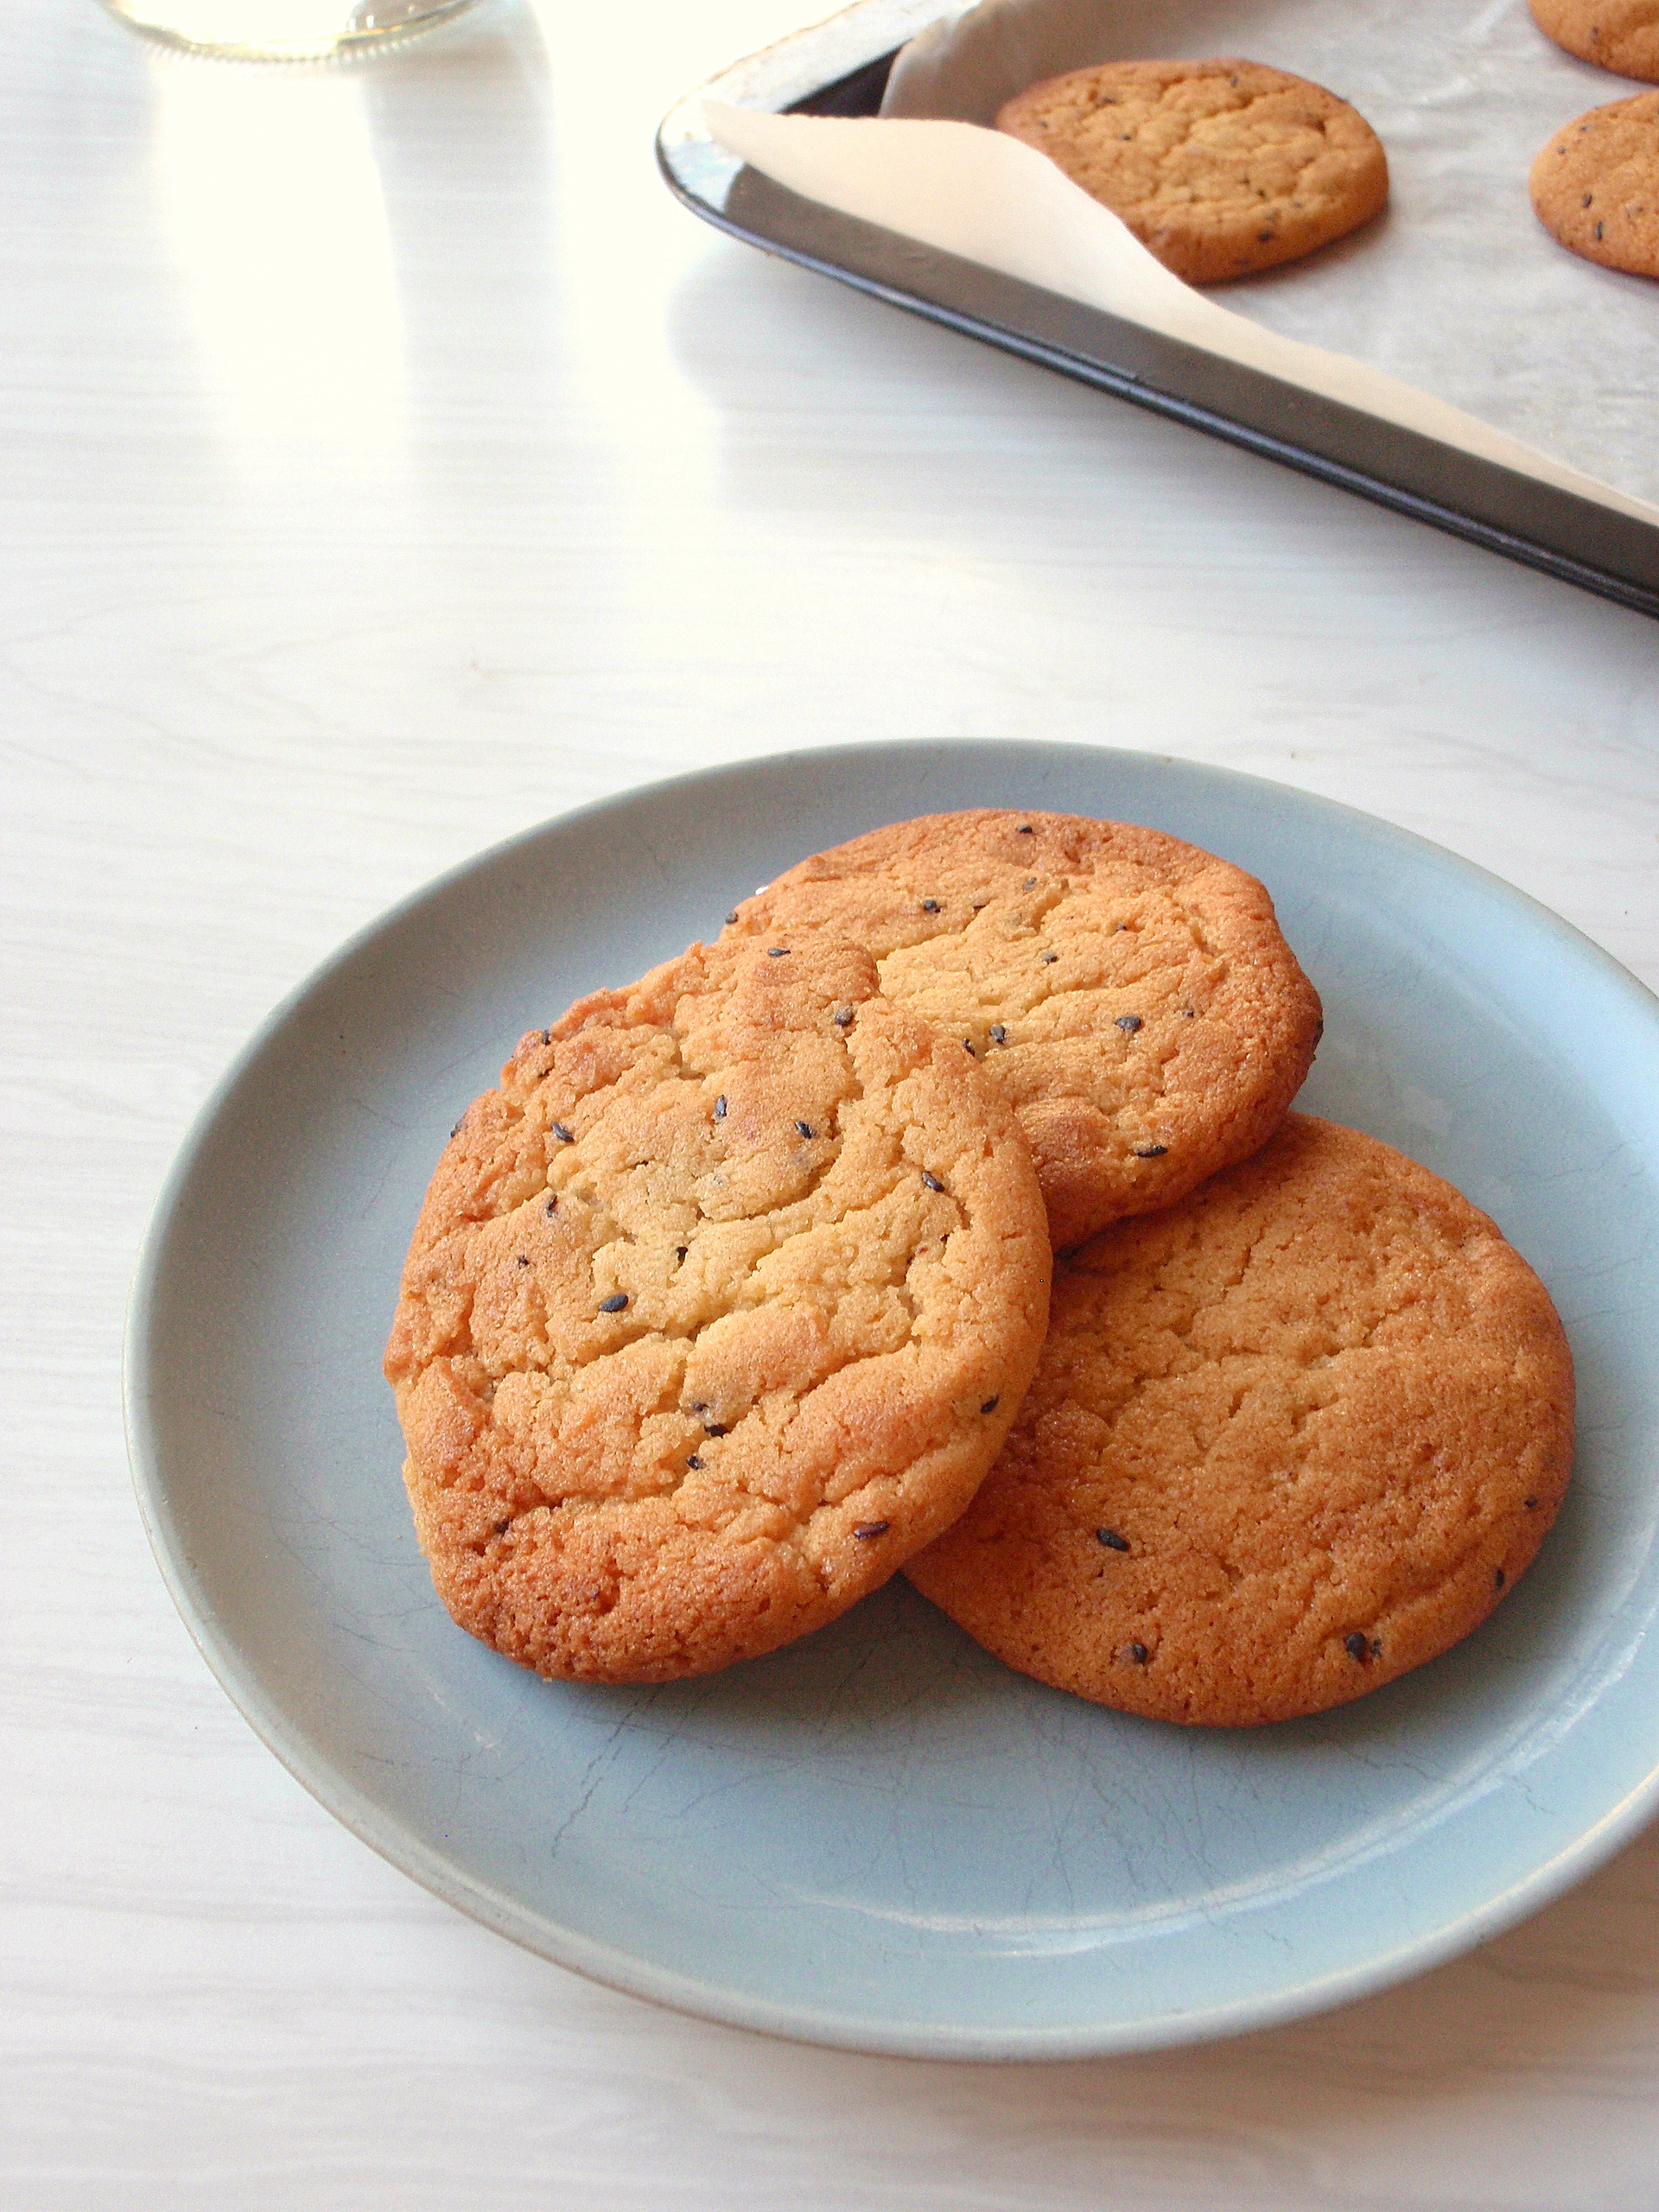
So this year, on the first anniversary of the very first post on this blog, I don’t have an amazing birthday cake full of seasonal fruits and flavours for you. I don’t even have anything that says it should be summer, no plums or peaches, no boysenberries or cherries or nectarines. But you know what I do have? Miso cookies.

Yes! Miso cookies! Now here is something I’m excited about, and that you can get excited about too, no matter what the season. I’d been mulling the idea over for a while, actually since I got my hands on the second issue of Lucky Peach, which had this fantastically illustrated feature on miso (all of the types!) and also Christina Tosi’s recipe for the corn cookies served at Momofuku Milk Bar. I haven’t spent enough time in New York City to have ever visited any of the Momofuku restaurants, let alone Milk Bar,*** but their stuff is pretty legendary, and anyway I was intrigued by the “10-minute creaming process” involved in making the corn cookies.

So I started thinking about a cookie, with miso, kind of like a peanut butter cookie in crossing the savoury-sweet bridge. Something that’s both chewy and crisp. Something that would involve creaming butter and sugar together for ten whole minutes and begging forgiveness of the tired old electric mixer afterwards.

The result was this: exactly what I had envisioned, with the added touch of a tablespoonful of black sesame seeds sprinkled through. Straight out of the oven, they were a dream – hot, buttery, almost-gooey – that only got better as they cooled to crispy-edged, chewy-centred, salty-sweet cookies with an extra nutty hint of sesame. Like peanut butter cookies. But better.

*Er, does anyone who reads this blog actually live in Iceland? I’m only going by summer photos of Reykjavik I’ve seen on street style blogs… I mean, it would be pretty cool to be in Iceland, but, also… cool.

**It’s something I generally refuse to do, no matter how cold it gets. I’ll wear pants, yes, but tights? Not in summer, not on my life. (Or maybe not anymore.)

***Though clearly I need to. Look at their menu!

SESAME-MISO COOKIES
(adapted from Christina Tosi’s corn cookie recipe in Lucky Peach. Awesome.)

200g butter, room temperature or a bit softer, though not melted
300g sugar
1 egg
2 tbsp miso*
275g flour
1/4 tsp baking soda
3/4 tsp baking powder
1 tbsp sesame seeds**

Cream butter and sugar using a mixer (stand or handheld) for a couple minutes, until the mixture starts to fluff up. Add the egg and beat on a medium-high speed for 8 or so minutes, until the sugar’s pretty much dissolved and it looks a bit like this. Now mix in the miso until it’s all blended together.

In a separate bowl, mix together the dry ingredients and add to the butter mixture. Stir it well (I abandoned the mixer and used a wooden spoon at this point) until it all comes together. If it seems a bit dry at first, don’t worry. It will come together.

If you haven’t already, stir in the sesame seeds. Chill the dough in the refrigerator for about an hour. I actually popped the whole bowl, covered, into the freezer while I cleaned up the mess I’d made and that seemed to work just fine.

Heat the oven to 180C. Drop walnut-sized balls of dough on a cookie sheet (lined with baking paper, if you’re so inclined) and bake for 12-15 minutes. Rotate halfway through and start checking after 12 minutes if your oven’s temperamental like mine. When they’re done, they’ll be a golden-brown colour, a bit more so at the edges, just a bit paler in the middle.

Cool on a wire rack. Share with those you love, and watch the look of puzzlement on their faces when they ask “Yum, what kind of cookies are they?” and you say, grinning, “Miso!”

Makes about two dozen. 

*I used 2 tbsp and the dough tasted quite miso-y, but after baking the miso flavour really mellows out quite a bit. Don’t worry, it’s nothing like miso soup. Next time I may try adding half a tablespoon more, though not too much more than that – otherwise it’d probably start to get too salty.

**You can add more if you like – I was just running low. 1 tablespoon makes cookies that are daintily flecked with sesame seeds. Not bad.

fig, walnut and oatmeal pancakes

In breakfast, sweets, year-round on 17 January, 2012 at 8:15 am

Just a quick little post today – I was trying to write this last night but my heavy eyelids claimed victory and I sunk into bed before 11 for the first time in 2012 (hooray!). And now it’s morning and I’m battling the clock to get to work on time. And I have plenty more pancakes to write about (!!) so I thought I’d better get on with this one. So, without further ado, I present Pancake #2.

If you recall, I started the year off with a little pancake project. On the first day, I made these crispy-edged little cornmeal griddlecakes, inspired by a Mark Bittman recipe in the New York Times. I didn’t really plan on making pancakes the next day, but I was intrigued by the idea of making pancakes with all kinds of different (non-flour) ingredients. So on the second day, I went back to that New York Times article and found this recipe for oatmeal pancakes. So began the Pancake Project – because if I’m eating the same thing (more or less) two or more days in a row and experimenting with ingredients and methods it’s more than just laziness or falling into a routine, right? It’s a project.

I’ve based these pancakes on Mark Bittman’s method of first cooking the oats before using them to make the pancake batter. The result is wholly different from the kind of oatmeal pancakes I’m used to – normal flour pancakes with some oats mixed in – and results in a pancake that’s far more dense and moist than you’d normally expect. They’re pretty much the opposite of the pretty stack of golden pancakes I’d made the day before, and the antithesis of anything you’d find in, say, an American diner.

I almost never order pancakes in restaurants because I often find myself underwhelmed – they’re so often too big, too floury or stodgy, or just plain boring. But these I could get used to. And okay, I’m not saying these don’t have a bit of stodge to them, but it’s good stodge – good, hearty, (dare I say it?) healthy stodge: plenty of fibre and protein (the more nuts, the better) and interesting texture and so much more flavour than the big, flabby flour-fests* that so often leave me disappointed.

So. I really encourage you to make these pancakes. They’re nowhere near fluffy, but they’re awesome. Also, because they’ve got cooked oats in them, they’re a bit porridgelike in consistency – but in a good, fried-in-a-skillet way. Perhaps it’d be a good way for porridge haters to get their oats? Let me know if you give it a try.

*er, okay, maybe I’m being a bit harsh. There are plenty of really delicious traditional flour pancakes out there. But I have had my share of decidedly average ones. Don’t tell me you haven’t.

FIG, WALNUT & OATMEAL PANCAKES
(adapted from this recipe by Mark Bittman in the New York Times) 

1/2 cup rye flour*
1/4 rolled oats
(here, I used the “quick cook” type – the smaller flakes)
1  tsp baking powder
3/4 tsp salt
1 egg
1/2 cup milk
2 cups cooked whole rolled oats
1 tbsp honey
1/3 cup chopped toasted walnuts
1/3 cup chopped dried figs

First, cook some oats – just in water is fine – I used about a cup of oats to get more or less two cups of cooked oatmeal. Let it cool a bit.

Meanwhile, mix together the dry ingredients (flour, oats, baking powder, salt) in a bowl. In a separate bowl, mix together the egg and milk, then stir in the cooked oatmeal and the honey. Add the wet ingredients to the dry ingredients and stir gently to combine. The mixture will be thicker than you might be used to for pancake batter, but you should be able to get thick, gloopy ladlefuls of it pretty easily – if it seems too thick, just add more water; if it seems too thin, add more flour. Fold in the walnuts and the fig pieces.

Cook in an oiled skillet (cast-iron is great) over medium heat, making sure the skillet’s nice and hot before you add the batter. Flip when they’re golden-brown on the underside and little bubbles appear on top (this may be less noticeable than with normal pancakes because of all the stuff that’s in the batter, so if in doubt, check the underside). I found 3-4 minutes on one side and then about 2-3 on the other worked well.

Serve with butter and honey.

*(or any flour, really, I just had rye and wanted to give them a bit more depth. I imagine buckwheat’d also be great)

cornmeal griddlecakes with vanilla-mint strawberries & honeyed sour cream

In breakfast, gluten free, summer, sweets, year-round on 5 January, 2012 at 12:59 am

I don’t know about you, but today was my first day back at work for 2012. (Happy new year, everyone! Hope you’ve all had a relaxing holiday. And if you’re still on holiday, hope you’re making the most of it!)

Tearing myself away from my dear, dear bed this morning was the hardest thing I’ve done all year (granted, we’re only four days in, but…), and I wasn’t feeling overly happy about heading back to work.* But I wasn’t feeling overly sad, either. Which was really good news: an improvement over this same time last year.

On the first day back last year I had the back-to-work blues, hard. I pretty much spent the whole of that first shortened week shuffling around in a mopey haze – I think I even had to go have a secret cry in the bathroom at work, which sounds utterly stupid in hindsight, but at the time it was serious business, like any half-decent self-pity session is when you’re in the midst of it.

Last January I was grieving the abrupt end of a summer holiday, pining for things I never knew I loved so dearly until I was torn away and shoved back under glaring fluorescent lights: the cliched things like sun, surf, sand, diving headfirst into waves, watching phosphorescence tumble through seafoam at midnight, cold watermelon scooped into balls, books and board games and beer. I was all full of mournful regret at not having had the foresight of taking extra time off work, and yeah, okay, first world problem, I’m sorry now, it sounds so silly in hindsight. (And, I’m happy to report, I got over it pretty quickly.)

So this year I was pleasantly surprised that, aside from a little difficulty actually putting work-related sentences together (and the weird typos that come from getting reacquainted with a normal keyboard, not my runty laptop one), today went pretty well. No tears, anyway, and with the help of lots and lots of coffee, I made it to 5pm relatively unscathed. And ready to do it all again tomorrow. Amazing!

Anyway, I don’t know what this all has to do with pancakes. But I can tell you that this year I’ve subbed pancakes for Pakiri, and going back to work was a little easier. A correlation? Probably not. But pancakes are always good.

For the first three mornings of 2012, I made three different batches of pancakes, each very different from the other. For whatever reason, I dubbed it the Pancake Project, and maybe it’ll continue over the next few weekend mornings, if I’m so inclined. Anyway, I intend to share at least the first three. So here’s the first (keep an eye out for the next two!).

These are pretty good: a bit different from your usual fluffy flour-based pancake because they’re made with cornmeal (aka polenta, depending on where you’re based) and so they’re a lot denser than your average pancake. But in exchange for fluffiness you get that sweet, crunchy exterior you find on the best, fresh-from-the-skillet cornbread** and a mild-flavoured, soft-textured interior that goes so well with the sweet-sharp strawberries and the sour cream.

You could just eat these with butter and honey or golden syrup or maple syrup, but I can highly recommend the strawberries and sour cream I’ve included here. Besides looking pretty, they’re really delicious: the strawberries get all syrupy and sweet and the sour cream gets all runny and dreamy with melted honey mixed in. A winning combination.

These would be perfect for a weekend brunch, or if you’re trying to impress someone special, or if you’re silly enough to get up extra early on your first day back at work*** you could make it for yourself as consolation that your holiday is, well, over. It’s not the end of the world, though.

*I must put this in perspective: I am so lucky to work at what is, without a doubt, the best place I’ve ever worked, and I’m not just saying this in case my boss is reading this – work is actually really, really great. It’s just that my bed holds just as dear a place in my heart.

**one of my favourite things on earth, especially while still hot from the oven. Oh boy.

***oh no, not me, no way. I clung to my sheets for as long as I could this morning.

CORNMEAL GRIDDLECAKES WITH VANILLA-MINT STRAWBERRIES AND HONEYED SOUR CREAM
(The recipe for the griddlecakes comes by way of this one by Mark Bittman for the New York Times. I’ve changed a few things to my liking after my first efforts fell someplace different from what I had in mind: I added an egg, sugar and ground almonds, and used a bit more liquid than the original recipe. But the method of using partially-cooked cornmeal as the base for the recipe is unchanged.)

This recipe makes enough for 2-3 people. Feel free to double or triple the quantities as needed.

For the strawberries

Put 1 cup halved strawberries (quartered if they’re particularly big) in a bowl and add 1/2 teaspoon vanilla paste, a few torn-up mint leaves and 1 tablespoon sugar. Give it a good stir so the sugar starts to dissolve, and let the strawberries macerate while you make everything else. They should get all nice and syrupy by the time you’re ready to serve.

For the sour cream

Make as much as you like, however sweet you like it: for every 1/3 to 1/2 cup sour cream, mix in a tablespoonful or two (I used two) of melted honey. You can play around with this ratio depending on your desired sweetness.

For the griddlecakes

3/4 cup fine or medium cornmeal (polenta)
2 tbsp sugar
1/2 tsp salt
1/4 cup ground almonds
1/2 cup buttermilk (you might not use this all, but good to have set aside just in case)
1 egg
1 tbsp melted butter

Mix the cornmeal, sugar and salt together and add 3/4 cup boiling water. Stir it all together and let it sit for 5-10 minutes until the cornmeal has absorbed all the water and is kind of half-cooked. Let it cool a little.

Add the ground almonds to the mixture and stir again to combine. Add the egg, 1/4 cup of the buttermilk and the melted butter. Depending on how liquid your batter is, you might want to add a bit more buttermilk. I ended up using between 1/3 and 1/2 cup and got the nice thin little pancakes you see here.

Cook by the ladleful (really, in whatever shape or size you like, just as you would normal pancakes) on a hot griddle or cast-iron skillet. Flip over when they’re nice and bubbly in the middle.

I found 3-4 minutes on the first side, 2-3 on the other side to be just about right for the little ones I was making.

Serve with the sour cream and strawberries and eat while hot and crisp from the pan (keep warm in the oven if you’re making these for a crowd; they’re so much better hot than cold).

*****ps. You can now find me posting random stuff (things I eat, photos of my cat, bits and pieces from the internet) on tumblr: http://eatinganddreaming.tumblr.com. Still trying to get the hang of it, but do come check it out if you like that sort of thing.

cucumber & mint sorbet

In desserts, gluten free, sorbet, summer, sweets, vegan, vegetarian on 22 December, 2011 at 12:59 pm

I’m only repeating what everyone around me has been saying, but whoa. Where did this year go? I can’t believe we’re only three days out from Christmas. And finally, it seems, after a week of torrential rain and cloudy skies that weirdly got me really down and unmotivated to do anything Christmas-like, the sun’s out. And it looks like it’ll stay. Summer is here!

I’ll keep this post relatively short because I’m sitting barefoot in the grass on my lunch break, squintily typing away while not knowing exactly what’s going on the screen. But I really wanted to share this sorbet before Christmas, you know, just in case you need a couple more things to add to your to-make list (mine is, luckily, pretty light since I’m going to Christmas dinner at my relatives’ place). Yes, you can enjoy a sorbet anytime during the summer (and all year round, if you ask me) but I just had this fleeting thought that this cool green sorbet would be more somewhat Christms-appropriate served alongside a bowl of strawberries, or you know, something bright red and festive.

I’ve been wanting to make cucumber sorbet for a while (Laura of Hungry and Frozen made a luscious-looking cucumber-lychee one earlier this year) but it hasn’t really been a priority: I have a growing list of about 16 different frozen dessert flavour combinations I want to make, and cucumber-mint was just one of them.

But on Sunday I found myself at the market clutching my last 50-cent piece, wondering if I could get one more thing. And then I realised I was standing directly in front of a box of 50-cent cucumbers. And I remembered cucumber-mint on my sorbet list, and my mint plant was getting pretty bushy… done.

Sunday turned out to be the first sunny day in what felt like an eternity but really was about a week straight of rain. Even though it was still a bit chilly I thought it’d be appropriate to celebrate the return of the sun by making sorbet that very day.

I can totally recommend making this too. It’s super easy to put together, and all you need to plan for if you’re making this for a special occasion is the time it takes to freeze (several hours, at least). And the flavour is divine: it’s without a doubt cucumbery, but not in a salady* way. It’s cool and sweet, almost watermelon-like in flavour, with the mint giving it a beguiling herbaceousness that doesn’t jump out at you but coolly sidles in alongside the cucumber. And then, long after the freezing-cold ice thaws in your mouth there’s a hauntingly minty chill. Yes, so refreshing.

Okay! So now that I’ve told you all that I’ve got to get out of the sun and back to work (just in time, too; I don’t think my eyes can squint any more than they already are,** and I’m starting to sweat from the heat of the sun).

Just a quick note – the recipe below makes about (very roughly measured by me, after I’d already eaten some, whoops!) 400ml so if you’re feeding more than 3-4 people I’d make a double batch. Enjoy!

*my goodness, can you tell it’s the silly season, my brain has turned to mush and my adjectives have turned… adjective-y.

**apologies for any typos. I’m really having a hard time seeing the screen!

CUCUMBER AND MINT SORBET
(makes about 400ml)

150g sugar
¾ cup water
handful of mint
300g cucmber, diced*

First, make some mint syrup: place sugar, water and mint in a saucepan and heat gently, stirring a bit to dissolve the sugar, until it reaches boiling point and the sugar has dissolved. Let cool.

While the syrup is cooling, cut up the cucumber and puree it (it’s probably best to use a food processor for this – I used a blender and it didn’t really work because it wasn’t liquidy enough. If you only have a blender, don’t fret – you can get it to a nicer consistency once you add the syrup in the next step).

Add the cooled syrup to the cucumber puree and blend until it’s a nice, smooth consistency. Strain out the pulpy bits using a sieve. Optionally, you could add an egg white here to prevent the sorbet from going all icy in texture, especially if you’re not using a food processor, but I didn’t have any handy so I used a tablespoonful of Hendrick’s gin** for the same purpose.

Freeze. If you have an ice cream maker, great – follow the instructions. I’ve never owned an ice cream maker so instead I just try to give the sorbet regular stirs as it freezes in order to break up the ice crystals that form. Giving it a couple of whizzes in the food processor during the freezing process made this fairly painless, too.

Before serving, let it sit out for a few minutes to soften up and become ultra-scoopable. Delicious!

*you can peel it if you like, but I didn’t bother – I liked the extra-deep green the skin added to the colour, and you strain out the pulpy bits anyway so you don’t need to worry about texture. Plus… more nutrients? Maybe?

*Cause really, does Hendrick’s and cucumber not just scream summer?

Edited to add: I’m submitting this post to the Sweet New Zealand blogging event, started by Alessandra and hosted this month by Bron – you can see all this month’s entries here.

chocolate earl grey thumbprint cookies with honey ganache

In baking, cookies, sweets, year-round on 21 July, 2011 at 11:11 pm

Two nights ago found me at the kitchen sink, elbow-deep in post-midnight dishes. It’s not often these days I find myself doing a full-on batch of washing-up, since I haven’t lived in a flat without a dishwasher since 2008. But the other night the dishwasher was already going and the kitchen was still full of the detritus from dinner and some serious baking (including a trial run – but more on that later).

I wasn’t very happy about doing the dishes when I had plans to get up five hours later to go to the gym before work (needless to say I didn’t make it), but I figured it was better to do a bit then rather than leave it til morning. And ‘a bit’ turned into a full-on kitchen clean, despite my protesting eyelids, and I realised I somehow enjoyed that fog-like haze of scrubbing and bubbles.

And for the last couple nights since then, I’ve broken out of my usual dishes routine in that I’ve actually been doing the dishes. Properly, with a sink full of suds and scalding hot water. I’m not the first person to discover that doing dishes is strangely cathartic (and it’s not the first time I’ve discovered that), but there’s just something about the combination of that hot water, the scrubbing, the so-tired-you-could-collapse feeling you so often have when you’ve had a long day and a big meal. It’s good. And it keeps you warm when you live in a rather cold house in a Wellington winter.

But going back to what got me to that kitchen sink in the first place: the mess I made baking these cookies. Actually the recipe itself is pretty straightforward and doesn’t involve too many dishes, but I somehow managed to use every single measuring cup and spoon and different-sized bowls and whisks and spoons for tasting (and being careful not to double dip, as I had been home sick that day). And I made this twice, and made dinner in between batches. So: a big mess.


The cookies were for the Wellington on a Plate Bake Club challenge we’re doing at work (how could we not?), hence the test batch: I was up against some stiff competition. Somehow, though our work has nothing to do with food, it seems as though nearly everyone in the office was born with a whisk attachment instead of a hand (er, debating the usefulness of that as I type). So these had to be good.

They also had to contain some Wellington ingredients – to that end I used Whittaker’s chocolate and Tea Leaf T Earl Grey as well as my usual Wairarapa eggs – and, because I hadn’t left the house for two days due to a major cold, they had to consist only of ingredients found in my cupboard.


I used this recipe from the Martha Stewart website – not a site I normally visit but it’s full of enticing cookie recipes – and didn’t really change much except for the addition of Earl Grey tea leaves in the mix. I’d had this idea in my head of Earl Grey shortbread for ages and wasn’t too sure how well it’d pair with chocolate (another reason to do a test batch).

It worked: the cookie was chocolatey, with a hint of bergamot that would grow more pronounced as you chewed and swallowed. The first time around I used a couple of teabags of Twinings ripped open and added to the dry mix. The second time I used looseleaf tea, and blitzed it with the sugar to make it a little finer. I didn’t really notice a difference in terms of flavour when using the looseleaf as opposed to teabags, so use whatever you’ve got.

And I was intrigued by Martha’s addition of honey and butter to the ganache (original recipe here). I used manuka honey (again, what I had in the cupboard) and the flavour was just pronounced enough to make it a little out of the ordinary. The second time around I made it without the butter (post-midnight baking, totally forgot) and I didn’t really notice a difference.

Try these cookies. And then try doing the dishes afterwards. Even if it’s after midnight. It’s not all that bad, I promise (and you’ll have a clean kitchen too!).

CHOCOLATE-EARL GREY THUMBPRINT COOKIES WITH HONEY GANACHE
(based on these recipes from the Martha Stewart website)

For the cookies:

1 cup flour
1/2 cup cocoa powder
a pinch of salt
Earl Grey tea (teabags or looseleaf)
2/3 cup sugar
110g butter
1 egg yolk
1 tbsp cream
1 tsp vanilla 

Preheat the oven to 175C. Sift together flour and cocoa powder and a pinch of salt. Rip open a couple of teabags of earl grey and mix that in.* Set aside.

In another bowl, cream together butter and sugar and then add the egg yolk, cream and vanilla. 

Mix in the dry ingredients. It will be pretty crumbly; don’t worry about this. It will come together when you form the dough into balls (roughly 1 tablespoon). Roll the balls in some sugar and place on a baking tray. Use your pinky to poke an indentation into each one and bake for 10-12 minutes, until just set (careful not to burn, or cook too long, they’ll get dry).

For the ganache:

1/6 cup cream
1/6 cup honey***
55 or so grams dark chocolate, chopped

Put the chopped chocolate into a heatproof bowl. Melt the honey into the cream over low heat. Once it’s simmering nicely, pour over And let cool a minute or so. Spoon a bit of ganache into the indentation in each cookie. Let cool until completely set.

Makes about 25.**

*If you’re using looseleaf tea, I recommend blitzing it in the food processor with the sugar beforehand, so it’s not as big and grainy. In that case, don’t add it here.

**I halved the original recipe, because it said it makes about 90, which I thought a little excessive. I made mine a little bigger, though, so only came out with about 25 per batch. I also used salted butter (it’s what I had) so left out the salt called for in the recipe. Here I’ve kept a pinch in, just in case.

***Awkward measurements, I know. I found the easiest way of doing this was half-filling a 1/3 cup measure with honey, topping that up with cream, and then dumping the whole thing into the saucepan.

ginger-poached quince

In autumn, breakfast, sweets on 8 July, 2011 at 7:45 pm

I know, this post is woefully out of date, and quinces are woefully out of season. But I’m going to post this anyway, because the recipe is equally applicable to pears, and this is just as much about the porridge as it is about the quinces.

Every Sunday when I was growing up (and maybe he still does) my dad would make himself a big bowl of porridge and a big pot of coffee and spread the Sunday paper all across the dining table and go through it page by page.

He cooked the porridge with a special pot and a special wooden spoon (actually a wooden shamoji) that no-one was allowed to touch for anything else. And if I wasn’t too busy wolfing down cereal, or getting in the way of the paper, I’d get some too.

Dad’s weekend porridge was special, different to the sickly sweet instant sachets I loved at the time. For one, it took longer to cook than sixty seconds in a microwave. And unlike the flavours I loved (blueberries n’ cream! maple walnut spice!) his never changed: just brown sugar and milk, over perfectly cooked oats.

But I loved the way the brown sugar melted into caramel pools swirling in milk, the pure sugar hit I’d get for the first few spoonfuls while I resisted stirring it in, finally succumbing after a few bites and mixing it all together.

Porridge is such an intensely personal thing. Every person I’ve met (and talked porridge with) has their own favourite way of making it. Some people claim not to like porridge, but I like to think they just haven’t found the version that suits them yet. (If that’s you, don’t give up!) My favourite way of eating porridge isn’t the way my dad makes porridge, or how you’ll get it in a cafe (well, any cafe I’ve eaten porridge at, at least).

I like my oats hearty and whole, chewy almost, but still cooked through and soft enough to qualify as comfort food. I soak them overnight with a little bit of buttermilk or plain yoghurt – according to this book soaking the oats helps break down phytic acid and improve their nutritional benefits, but I mostly like the way it cooks up in the morning, quick and extra-tender. And instead of milk, I top my porridge with a bit of butter and a splash of cream – the butter sounds weird, but trust me, it’s good.

(In case you’re interested, I’ve posted my method below.)

But back to these ginger-poached quinces: save this thought for next quince season. They’re so very good, and simple too. You just need a bit of time and patience for them to cook ever-so-slowly until they get all rosy and soft and sweet and gingery. (So gorgeous and dainty, I could fawn over them all night but I won’t, because it’s Friday and a girl needs a night out every once in a while.)

They’re good on their own with a bit of cream or mascarpone, or on top of some puff pastry, popped in the oven, or anything you feel like really – but I couldn’t stop eating them on porridge, as you might have already guessed. They turn something everyday like oatmeal into something really special, especially if you drizzle a bit of the poaching liquid over the top instead of brown sugar or maple syrup. That stuff goes straight to the soul.


GINGER-POACHED QUINCE

Take roughly 250-300g quince (2-3 quinces, depending on size), peeled and sliced, and put into a saucepan with 1-2 thumb-sized pieces of ginger, sliced up, about 3/4 cup sugar and plenty of water. Slowly bring to a gently boil and then turn the heat right down to low. Let simmer for ages until the quince turns a nice rosy hue and the liquid is all gingery and syrupy when you taste it (and taste away, but think of your teeth! This stuff is a cavity in the making).

Keeps forever in the fridge, and is great for countless applications like: for a porridge topping, served with yoghurt, cream or ice cream, to go on/in pastry, etc!

You can just as easily do this with pears. If you do, allow less time to cook. Also, it’ll be easier if you use slightly underripe pears so they don’t fall to bits.

MY FAVOURITE WAY OF COOKING PORRIDGE:

Soak oats* overnight, at room temperature, with 1 tbsp buttermilk or unsweetened yoghurt, and lukewarm water (in an equal proportion to the oats).

In the morning, dump the bowl of soaking oats in a saucepan with some more water (I use the same measurement as I use for the oats).** Put the heat on medium to medium-low, go do some other things for a few minutes (getting ready!) and when it’s cooked to a nice porridgey consistency, take it off the heat.

Put in a bowl. Put a splash of cream and a little pat of butter on top. Don’t feel guilty, they help you digest the oats better. (Unless you’re lactose intolerant maybe.) Top with whatever: maple syrup, brown sugar, lots of fruit, or in this case, the ginger-poached quince (or pear!).

*I usually use 1/3 cup for myself, but feel free to adjust depending on how hungry you are in the morning/how many people you’re cooking for.

**At this point I’ll often add a chopped up banana, or pear, or dates or raisins so they cook along with the oats and get all soft and delicious.

PS. This spoon is Part Three of the castaway airline cutlery my mum dumped on gifted me a while back. One of my favourites: I’m not too clear what the connection between United Airlines and fish scales is/was, but kind of amazing nonetheless. (Parts One and Two are here and here).

cherry, vanilla + walnut sticky buns

In baking, breakfast, sweets, year-round on 15 February, 2011 at 8:31 pm

I’ve been trying to think of ways to use up this dud cherry-vanilla jam* I made a couple weeks ago.  I had this vague idea of making sticky buns inspired by the cranberry and pistachio ones at Queen Sally’s Diamond Deli out in Lyall Bay (holy crap they’re amazing) and THEN the ever-so-awesome Laura from Hungry and Frozen made these Norwegian cinnamon buns out of Nigella Lawson’s How to Be a Domestic Goddess and that’s all it took – I was sold. Sticky buns it was.

Sticky buns and walnuts are natural friends, as are cherries and vanilla and walnuts (if I attempt to make cherry jam again I’ll include walnuts à la this recipe from Curious Kai). And thanks to some onto-it family members (box stuffed with assorted food = best Christmas gift ever) I had plenty of walnuts lying about.

I love the ceremony involved in making sticky buns: clearing off a big space to roll the dough into a big, flat sheet, spreading the filling over the top, adding way more butter than you think any rational person should ingest (maybe laughing maniacally as you do), coiling up the whole thing into a neat cylindrical roll, slicing and arranging the buns-to-be. There’s a lot of anticipation involved, and it comes to a head when they’re sitting in the oven releasing that fresh-bread-plus-so-much-sugar-and-butter fragrance.

Although making cinnamon rolls has long been on my list of favourite weekend activities, for some reason I couldn’t find my trusty dough recipe. Luckily I had been looking through How to Be a Domestic Goddess after reading the aforementioned Hungry and Frozen blog post and settled on using the dough from Nigella’s recipe for schnecken. Not that I’d made it before. But it sounded like it might work.

CHERRY, VANILLA + WALNUT STICKY BUNS: (makes roughly a trayful)

For the dough (adapted from Nigella Lawson’s Schnecken from How to Be a Domestic Goddess):

Mix together 500g flour, 50g sugar, 1/2tsp salt, and 15g fresh yeast (get this! it’s amazing and cheap. or if not, you can use half that amount of regular active dried yeast). Combine 75g unsalted butter and 150ml milk – Nigella says to melt them together in the microwave, which worked just fine – and beat in 2 eggs. Add this liquid mixture to the dry stuff, mix it up, make some dough. Then knead for about 10 minutes until smooth and pliable, and form into a big doughy ball. Butter (or oil) a large bowl and roll the dough in it (so that it’s coated in butter), then cover the bowl with plastic wrap or a clean, moist tea towel. Let it sit for a while in a warm place (hot water cupboard? in the oven on the very lowest setting? or maybe your house is naturally warm?) for about an hour, until doubled in size.

Go do something else for a bit and when you come back the dough should be gloriously proud and puffy and smooshy; knock it around a bit and give it a knead or two to bring it back down to size.  Roll out on a floured surface into a flat, long rectangular shape (Nigella says 60x30cm, but I didn’t measure) and slather the filling mixture all over the dough.

Filling mixture?

Here’s where things get a bit tricky. Since I was using dud cherry-vanilla jam that was too sticky to spread, I softened about 250g jam in about 100g melted butter and spooned this concoction over the top.  Since I don’t recommend going to the effort of making homemade dud-jam (I mean, you can…), you could do one of a couple things:

1. You could mix non-dud jam with a little less butter (maybe 50-75g depending on the consistency of your jam) and 1 tsp vanilla paste or extract and spread this over the dough.

2. Or you could skip the jam altogether and pour over 50-75g melted butter mixed with 1 tsp vanilla paste/extract and sprinkle about 1/2 cup sugar over the whole thing, and scatter dried cherries all over the surface. It’ll turn out a bit different, but still good – think raisin-studded cinnamon roll.

Whatever you end up doing, eventually you”ll sprinkle more or less 1 cup roughly chopped walnuts over the whole thing, and carefully roll it up lengthwise so you end up with a long, python-like hunk of dough (okay, maybe not that big, but sort of thick and snaky). Be sure to keep things tight but not too squashed together.

Cut into slices like you’re making sushi (and, if you’re anything like me when I make sushi, eat the raggedy end bits before anyone sees). I cut mine about 1 – 1 1/2 inches thick. Place into a buttered baking tray – it’s okay if they’re pretty close together – and let prove for 20-30 minutes.  This is a good time to preheat the oven to 180C/350F.

When the buns have proved, and are nice and puffy and cosily tucked in together in their tray, pop this into the oven for 20-25 minutes and wait for your house to start smelling incredible.

When they’re done, you can eat them plain, or you can drizzle with a simple white icing – I usually start with 1 tbsp milk for every 1 cup icing sugar and add more milk and/or sugar as needed to make a gooey, not-too-runny icing.

Give these to everyone you know; they will love you for it.

*dud cherry jam: it all started out with good intentions, inspired by a tweet by @summerfieldsfds, I semi-ruined it -added twice as much sugar as I should have (forgot to adjust for quantity), and simmered it for far too long (absent-mindedness may have played a part in this). What I got was a very solid, un-spreadable, overly sweet, sticky mass. With chewy cherry bits. Not so nice for toast. However, it was perfect for filling these sticky buns. Not that I’m suggesting you go out and make your own homemade dud-jam for this, but…